Showing posts with label christmas. Show all posts

Friday, January 7, 2011

Thrifty Holiday Storage Solution

I'm a bit of a cheap-o, so when it came down to storing all my Christmas decor I was not about to pay $20 for the storage containers sold at most stores.

I saw storage solutions like these everywhere and immediately thought I could that!

I had all the supplies already on hand, so I didn't have to shell out any dough. Just the way I like it!

I already had a large Storage Container that I was using to store my Christmas stuff and I had tons of cardboard boxes laying around from all the online shopping I do. (Yeah, I'm guilty of being that girl).

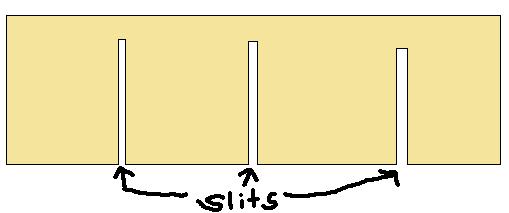
I started by cutting the boxes down to size. I wanted the storage grid to be tall enough and wide enough to fit some bigger ornaments. The length and width of the strips of cardboard depend on the size of your container, but I found that 6" was the perfect height for my big ornaments and created plenty of space to double up some of the ornaments. I cut slits into the lengthwise cardboard strips. You want to create slits that are wide enough to fit over the cardboard, but thin enough so that it sits snugly over the cardboard.

Set up your grid pattern inside your container. It should look something like this.


Now you can add a piece of cardboard over your grid and make another grid to stack on top or you can just start storing stuff over the ornaments.

For the Christmas lights I just took leftover strips of cardboard and wrapped the lights around them. It's as simple as that.


Viola! Christmas storage made cheap!

What thrifty storage solutions have you come up with??

Saturday, December 18, 2010

Christmas Tree

Our tree is up and presents are wrapped.

This is actually the first year I put up a tree since moving to Maryland 3 years ago. I've accumulated a few ornaments here and there and recently purchased a couple packs, but I think I still need more.

Anyways she looks pretty naked barren.

I've done the color coordinated red and gold tree before, but lately I've been feeling a little more adventurous and loved all the whimsical ornaments I've been finding at vintage stores and Macy's in particular.

I was having a hard time getting a picture of the full tree, so here's a peak at the skirt I picked up at Michael's for $20. It's made out of felt and has bells and puff balls attached to it, but the presents are covering most of it.

I picked up the flower at a vintage shop the year before last (told you I've been accumulating ornaments lol) for about $7. I bought the house ornament to commemorate the purchase of our first house. In gold marker I wrote on the bottom of the ornament "Our 1st home 2010" and included our address for hopefully future generations to see.


Below the house is an ornament of a Bichon Frise I found last year (again, I've been collecting them) in honor of my little man.

 See the resemblance??

I found a lion and an owl at Macy's. They were about $2-4 each. Pretty f-ing cute if you ask me :)
I also found a robot!
And a Baltimore cityscape ornament in honor of the area we live in. We don't live in Baltimore, but it's 15 minutes away. When anyone from out of town asks, we pretty much say Baltimore...

And here are a few more vintage ornaments I found.


Hopefully after Christmas when all the leftover Christmas stuff gets heavily discounted I can find some more ornaments. Crossing my fingers.

Ball-o-Yarn Ornament

The multitude of posts that are clogging up filling my blog roll recently have inspired me to share my own DIY ornament.

This has definitely been done before (hence where my idea came from) so I claim no proprietary rights for this idea and promise not sue anyone for patent infringement if and when you copy me.


Gather your supplies:
Yarn (any color, I went for the color I wanted in the cheapest brand I could find)

Note: You don't have to use clear glass ornaments, you can really use just about anything. Racquetballs or ping pong balls would work wonderfully as well.

Step 1: Take off the thingy at the top of the ornament.
Step 2: Dab a little glue at the neck of the ball and hold yarn in place. At this point walk away for 5-10 minutes so that the glue can dry. If you don't walk away you'll be pulling off the yarn every 9 seconds to see if it's dry yet. Trust me. I pulled it off. Every 9 seconds. For like 6 minutes.
Step 4: Add a few lines of glue going down the ball. Not too long though, it tends to dry up fast.
Step 5: Wrap your yarn around the ornament.
Step 6: Keep wrapping.
Step 7: At some point when you hit the fattest part of the ball it starts to get harder to wrap the yarn around using the glue lines I mentioned above. So I tried the method in this picture out and that seemed to work better.
Step 8: Finish wrapping the whole ball. You can leave it how it is or you can go crazy wrapping the yarn in all sorts of directions. I chose to keep it sorta simple. It was late and I was tired, so I got lazy.

Please excuse the pictures. My camera all of the sudden takes crap pictures. Apparently my iPhone does a better job. Me not happy.